Tech Tutorial
May 28, 2026
⏰ 5 min read
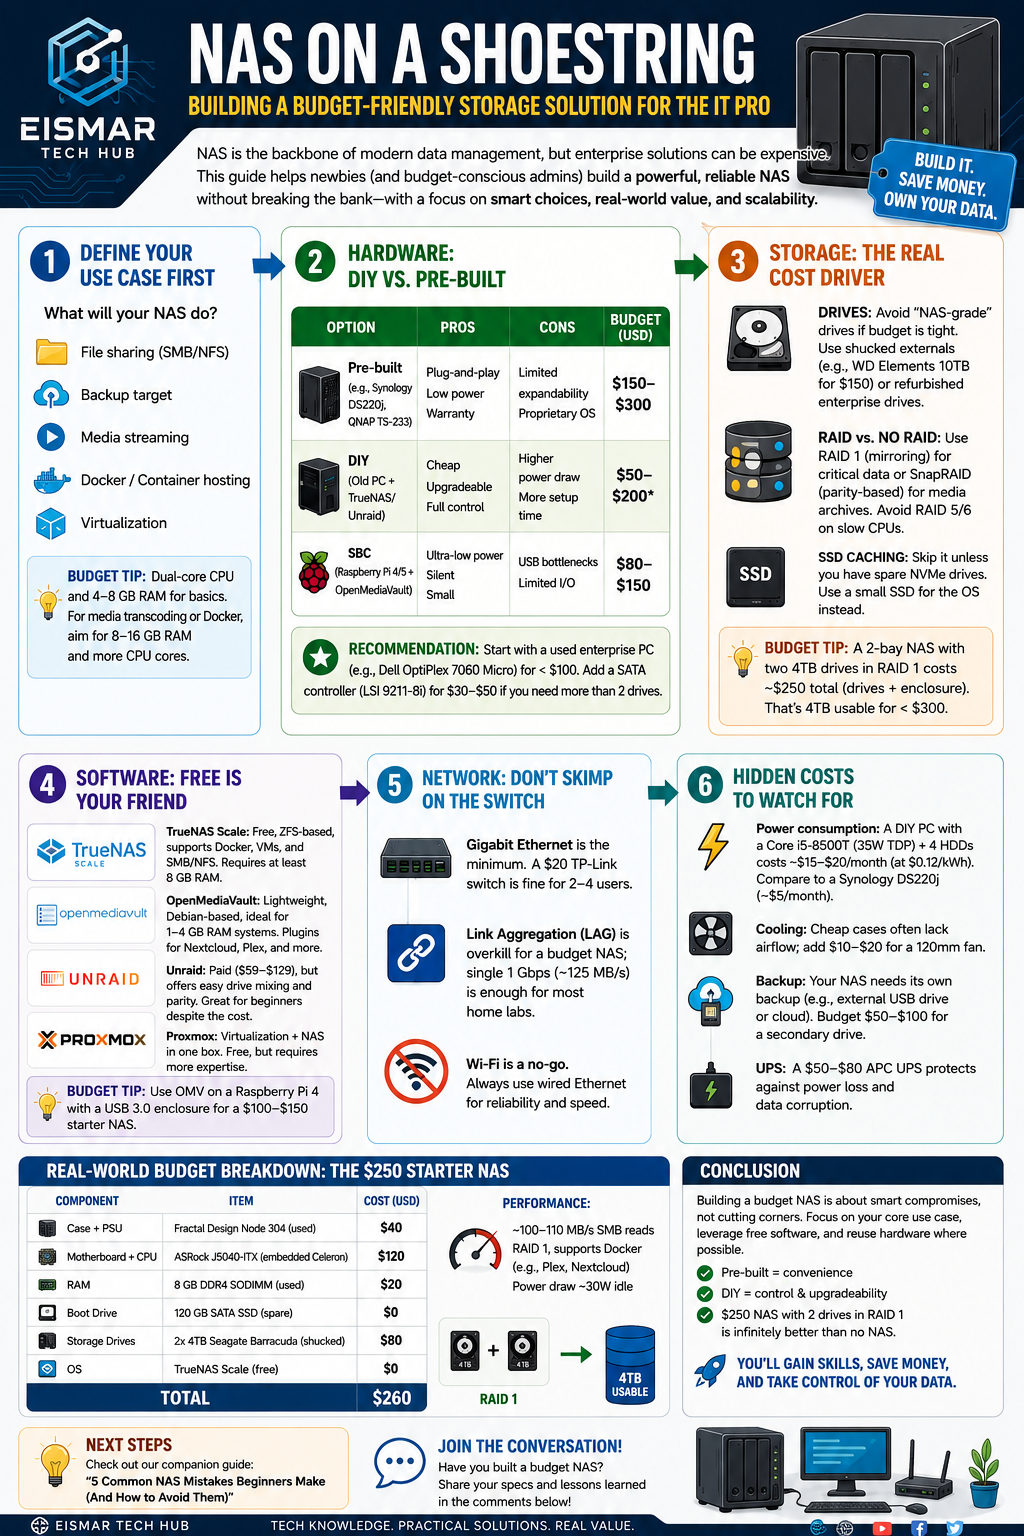
NAS on a Shoestring: Building a Budget-Friendly Storage Solution for the IT Pro
👤 Admin
#nas-budget-for-newbie
Introduction
Network Attached Storage (NAS) is the backbone of modern data management, but for IT professionals and system administrators, the allure of enterprise-grade solutions often comes with a hefty price tag. Whether you’re setting up a home lab, a small office environment, or a proof-of-concept for a larger deployment, the challenge is balancing performance, reliability, and cost. For the newbie (or the budget-conscious admin), the question isn’t “Can I afford a NAS?” but rather “How can I build a NAS that doesn’t break the bank while still meeting my needs?”
In this post, we’ll dissect the NAS budget for newcomers, focusing on hardware, software, and hidden costs. We’ll cover key considerations, pitfalls to avoid, and practical tips to maximize value. By the end, you’ll have a roadmap to deploy a functional, scalable NAS without sacrificing critical features like data integrity, redundancy, or remote access.
---
Key Points: The Budget NAS Blueprint
1. Define Your Use Case First
Before spending a dime, ask yourself: What will this NAS do? Common scenarios for newbies include:
- File sharing (SMB/NFS for Windows/Linux clients)
- Backup target (Time Machine, Veeam, or rsync)
- Media streaming (Plex, Jellyfin)
- Docker/Container hosting (lightweight apps like Nextcloud, Pi-hole)
- Virtualization (Proxmox, ESXi test environments)
Budget tip: A dual-core CPU and 4–8 GB of RAM suffice for basic file sharing and backups. Media transcoding or Docker workloads demand more CPU cores and RAM (8–16 GB).
2. Hardware: DIY vs. Pre-Built
| Option | Pros | Cons | Budget Range (USD) |
|---|
| Pre-built (e.g., Synology DS220j, QNAP TS-233) | Plug-and-play, low power, warranty | Limited expandability, proprietary OS | $150–$300 |
| DIY (Old PC + TrueNAS/Unraid) | Cheap, upgradeable, full control | Higher power draw, more setup time | $50–$200 (if reusing parts) |
| SBC (Raspberry Pi 4/5 + OpenMediaVault) | Ultra-low power, silent, small | USB bottlenecks, limited I/O | $80–$150 |
Start with a used enterprise-grade PC (e.g., Dell OptiPlex 7060 Micro) for under $100. Add a SATA controller (e.g., LSI 9211-8i) for $30–$50 if you need more than 2 drives.
3. Storage: The Real Cost Driver
- Drives: Avoid “NAS-grade” drives (e.g., WD Red, Seagate IronWolf) if budget is tight. Use shucked external drives (e.g., WD Elements 10TB for $150) or refurbished enterprise drives (e.g., HGST Ultrastar 4TB for $40–$60).
- RAID vs. No RAID: For a budget build, use RAID 1 (mirroring) for critical data or SnapRAID (parity-based, allows mixed drive sizes) for media archives. Avoid RAID 5/6 on slow CPUs.
- SSD caching: Skip it unless you have spare NVMe drives. Budget builds benefit more from a dedicated SSD for the OS.
Budget tip: A 2-bay NAS with two 4TB drives in RAID 1 costs ~$250 total (drives + enclosure). That’s 4TB usable for under $300.
4. Software: Free is Your Friend
- TrueNAS Scale: Free, ZFS-based, supports Docker, VMs, and SMB/NFS. Requires at least 8 GB RAM.
- OpenMediaVault (OMV): Lightweight, Debian-based, ideal for 1–4 GB RAM systems. Plugins for Nextcloud, Plex, and more.
- Unraid: Paid ($59–$129), but offers easy drive mixing and parity. Great for beginners despite the cost.
- Proxmox: If you want virtualization + NAS in one box. Free, but requires more expertise.
Budget tip: Use
OMV on a Raspberry Pi 4 with a USB 3.0 enclosure for a $100–$150 starter NAS.
5. Network: Don’t Skimp on the Switch
- Gigabit Ethernet is the minimum. A $20 TP-Link switch is fine for 2–4 users.
- Link Aggregation (LAG) is overkill for a budget NAS; single 1 Gbps (~125 MB/s) is enough for most home labs.
- Wi-Fi is a no-go. Always use wired Ethernet for reliability and speed.
6. Hidden Costs to Watch For
- Power consumption: A DIY PC with a Core i5-8500T (35W TDP) + 4 HDDs costs ~$15–$20/month (at $0.12/kWh). Compare to a Synology DS220j (~$5/month).
- Cooling: Cheap cases often lack airflow; add $10–$20 for a 120mm fan.
- Backup: Your NAS needs its own backup (e.g., external USB drive or cloud). Budget $50–$100 for a secondary drive.
- UPS: A $50–$80 APC UPS protects against power loss and data corruption.
---
Real-World Budget Breakdown: The $250 Starter NAS
| Component | Item | Cost |
|---|
| Case + PSU | Fractal Design Node 304 (used) | $40 |
| Motherboard + CPU | ASRock J5040-ITX (embedded Celeron) | $120 |
| RAM | 8 GB DDR4 SODIMM (used) | $20 |
| Boot Drive | 120 GB SATA SSD (spare) | $0 |
| Storage Drives | 2x 4TB Seagate Barracuda (shucked) | $80 |
| OS | TrueNAS Scale (free) | $0 |
| Total | | $260 |
~100–110 MB/s SMB reads, RAID 1, supports Docker (e.g., Plex, Nextcloud). Power draw ~30W idle.
---
Conclusion
Building a budget NAS as a newbie isn’t about cutting corners—it’s about smart compromises. Focus on your core use case, leverage free software, and reuse hardware where possible. Pre-built units offer convenience, but DIY builds give you control and upgradeability for less money. Remember: a $250 NAS with two drives in RAID 1 is infinitely better than no NAS at all.
For IT professionals, the real value lies in learning: setting up ZFS, managing shares, and troubleshooting network bottlenecks. These skills transfer directly to enterprise environments. So, grab that old office PC, install TrueNAS, and start building. Your data (and your wallet) will thank you.
 Next steps:
 Check out our companion guide on
“5 Common NAS Mistakes Beginners Make (And How to Avoid Them)” for more practical tips.
💬 0 Comments